Follow the steps to add pagination to the WordPress website:
Step 1: Navigate to your theme folder & open the “index.php” or any other archive template where you want to add the pagination.
Step 2: Write the following code at the bottom of the template file:
<nav>
    <?php echo paginate_links(); ?>
</nav>
It’s not mandatory to write the code within a <nav> tag but it’s a good practice for SEO (search engine optimization) reasons. And it will also help you to write custom styles. You can even give it a CSS class or ID.
Only the (above) single line of PHP code will enable pagination in your WordPress website or theme.
But you have to write CSS to make the pagination links better. To quickly get started, you can use the following CSS or modify it as per your need.
nav {
display: -webkit-box;
display: -ms-flexbox;
display: flex;
-webkit-box-pack: center;
-ms-flex-pack: center;
justify-content: center;
margin: 30px 0 60px 0;
}
nav .page-numbers {
display: inline-block;
padding: 8px 15px;
margin: 0 5px 0 0;
border: 1px solid #E9EBEC;
line-height: 1;
text-decoration: none;
border-radius: 2px;
font-weight: 600;
}
nav .page-numbers.current, nav a.page-numbers:hover {
background: #E9EBEC;
}
nav .prev, nav .next {
position: static;
top: auto;
color: #ff711a;
font-weight: normal;
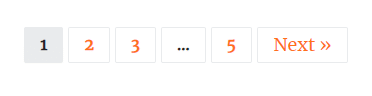
}With the CSS in place, your pagination will look like the following screenshots:

However, make sure that you have sufficient posts in order to show the pagination in your archive. For example- if you have only one or two posts, you will not see the pagination.
Generally, a single (archive) page contains 10 posts. But you can change the numbers from the “Settings » Reading”. However, if you have more than 10 (published) posts, you’ll see the pagination in action.
That’s all! Do you have any questions?