
reCAPTCHA protects your website from malicious software. It prevents spam bots from interacting with your site. Not only Elementor users but also every website needs this type of risk analysis engine that protects websites from vulnerabilities and annoying bot comments.
Elementor does not have any built-in artificial intelligence for Turing test capability. So you have to use a 3rd party tool to determine if a visitor is a real human or a spam bot.
How to use reCAPTCHA with Elementor form?
To protect the Elementor forms, I will use reCAPTCHA which is a completely free service from Google. Follow the steps with me.
1. log in to the Google reCAPTCHA website
Visit the Google reCAPTCHA website and click on the “v3 Admin Console” (see screenshot below).

You need a Gmail account to log in.
2. Register your site
After you sign in to “v3 Admin Console,” click the “+” (plus icon) in the upper-right corner. From there, you can register for a new site to use their reCAPTCHA services.

3. Choose your preferred reCAPTCHA type
Label: Give your project a name in the “Label” field. You can use any name in the Label field, but using your domain name is better. You may have multiple websites in the future, and the meaningful names will make sense.
reCAPTCHA type: There are two types of reCAPTCHA: reCAPTCHA v3 & reCAPTCHA v2. You can choose any one of these two. Let me show you how these two will look (see screenshots below).
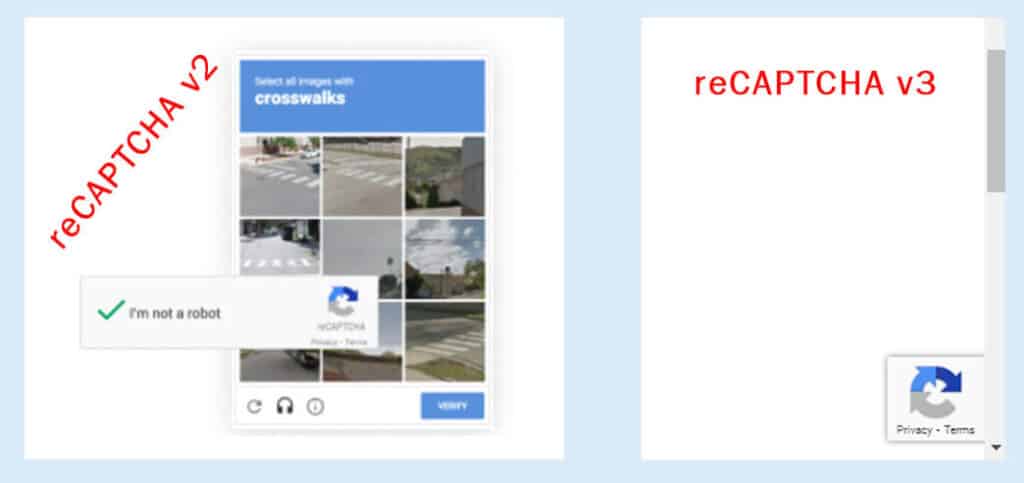
So choose whatever the reCAPTCHA type you like. But I am going with the reCAPTCHA v2 in this demonstration. However, the setting process is exactly the same for these two versions (v2 & v3). After you choose the “reCAPTCHA v2,” you’ll find 3 other subcategories & choose the first sub-category called (“I’m not a robot” Checkbox).
Domains: Write your domain without HTTP or HTTPS or www in the “Domains” field.
Owners: This field is automatically populated. However, if you’re working for a client then you can also add his/her Gmail ID.

Finally, accept the terms of service (Accept the reCAPTCHA Terms of Service) and hit “SUBMIT.”
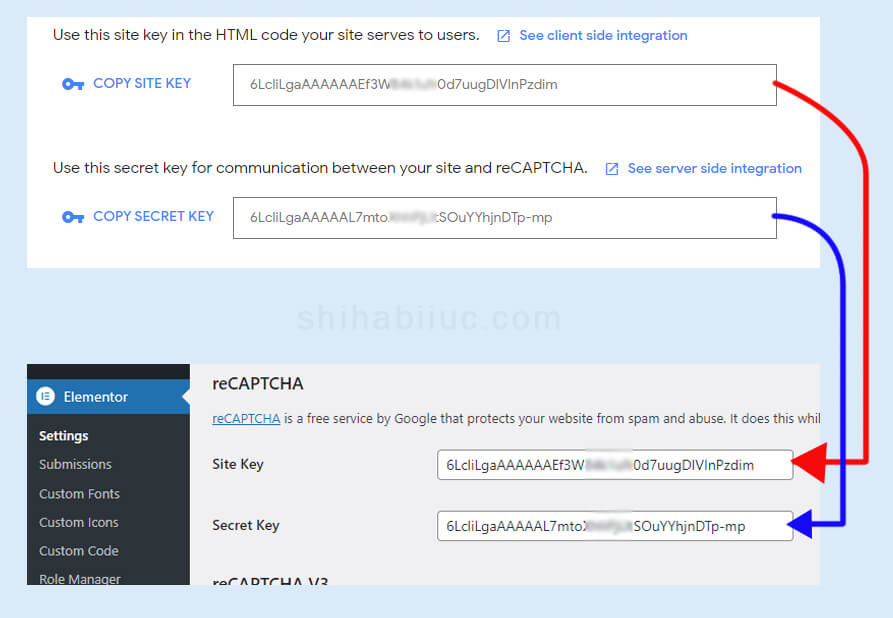
4. Get your “SITE KEY” & “SECRET KEY”
After you submit the form, you will get two reCAPTCHA keys (Site Key & Secret Key). Take a copy of these two keys or leave the page as it is and log in to your website in another window.
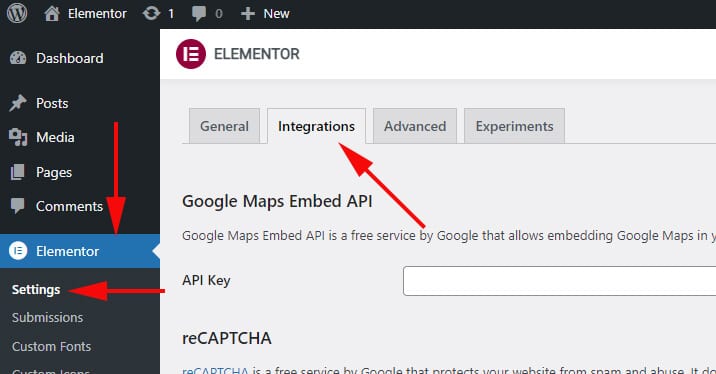
5. Connect your Elementor website with Google reCAPTCHA
Login to your WordPress dashboard and navigate to “Elementor → Settings” and click on the “Integration” tab. See the screenshot below.
In this “Integration” tab find the reCAPTCHA type. If you chose the “v2” on ‘Google reCAPTCHA’ website then find the “reCAPTCHA” option on Elementor (integration). If you chose the “v3” on the ‘Google reCAPTCHA’ website then find the “reCAPTCHA V3.” And copy & paste the “SITE KEY” & “SECRET KEY” (see the screenshot below for clarifications).
And hit “Save Changes.”
Now your Elementor website is connected with Google reCAPTCHA.
6. Add Google reCAPTCHA to the Elementor form
Now go to any of your Elementor forms and add a new filed item and choose the field type to reCAPTCHA or reCAPTCHA V3 (based on your setup). In my example, it was reCAPTCHA V2 and that is why I will choose the “reCAPTCHA.”

And hit “UPDATE.” That’s it! Now your Elementor form is connected with Google reCAPTCHA.