To add an image border, use the CSS “border” property for the <img> tag. See the first example below.
img {
  border: 2px solid #FF9800;
}
See the output below:

Border shorthand
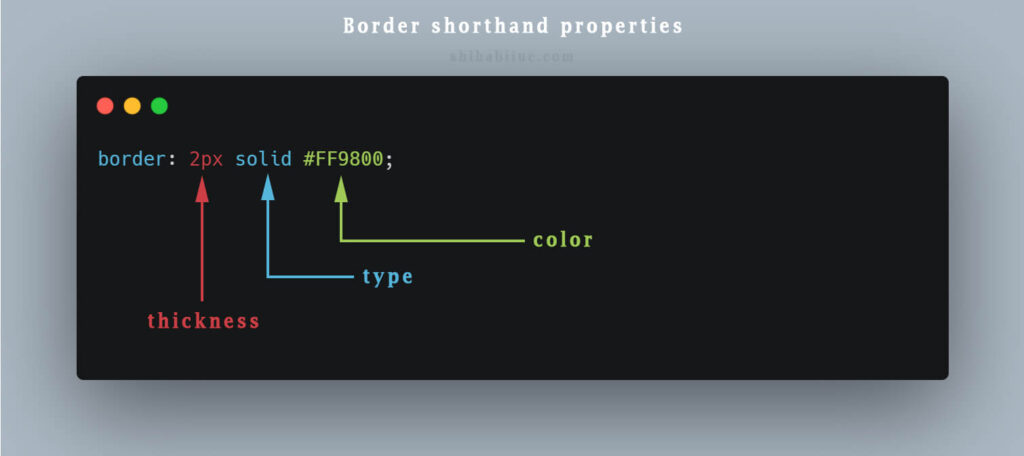
In the border property, the first item is the thickness. You can use any thickness such as 1px, 2px, 3px, etc.
The second item is the type of border. Such as solid, dotted, dashed, double, groove, ridge, inset, outset, etc.
The third item is the color of the border. Such as red, green, #FF9800, rgb(127, 17, 224), rgba(127, 17, 224, 0.8), etc.
Add a gap between the image & border
Add padding to the image in order to create a gap between the image & the border. See the example below.
img {
  padding: 0.25rem;
  border: 1px solid #15232D;
}
Output
See the output in the image below.
Create rounded corners to the image border
To make rounded corners, use the “border-radius” CSS property to the image. See the example below.
img {
  padding: 0.25rem;
  border: 1px solid #15232D;
  border-radius: 0.25rem;
}
Output
See the output below.
You can use any number or border-radius but 4px or 0.25rem look generally good as you see in the above example.
Add a border to a specific side of the image
In some cases, you may need to add the border to a specific side. For example, the top, right, bottom, and left borders.
And even you may want to add borders to 2 or 3 sides. See the following examples to see how you can do that.
In the next couple of examples, I will also add a slight padding in order to create a gap between the image & border. But you can ignore the padding.
Add left border only
img {
  padding: 0.25rem;
  border-left: 1px solid #15232D;
}
Output
In the same vein, you can add a border to any single side or multiple sides. To do that use any of the following properties you need:
border-top
border-right
border-bottom
border-left
For example, if you need to create only the left & bottom borders, see the appropriate properties accordingly.
img {
  padding: 0.25rem;
  border-left: 1px solid #15232D;
  border-bottom: 1px solid #15232D;
}
Output
You got the idea, right?
At this point, if you’re thinking why I am not using border shorthand instead of declaring the borders multiple times? If it’s you, kudos to you.
However, as of January 2023, you can’t use border shorthand for top, right, bottom & left as you generally do with CSS margin property. And I don’t think this shorthand will come up in the future.
So you have to implement the borders separately such as border-left, border-right, etc.
But you have border shorthand for thickness, type & color which I mentioned earlier.
Learn more about images
- How to resize an image in CSS?
- How to add images to an HTML table?
- How to create an image hover animation effect only with CSS?
- How to position text over an image with CSS?
- How to change an image on hover (CSS)
- Center an image in various directions & methods
- How to insert an image in HTML?
- How to right-align an image in HTML CSS?
- How to add image border in CSS [styles & examples included)
- How to create a hero banner image using HTML CSS?
- How to wrap text around an image in HTML?
- How to rotate text & images using CSS?
Conclusion
Adding borders to images is very easy as you saw in this post. You can be creative with CSS borders and use them in various ways. You saw a couple of examples that are generally used in real-world.
I hope you clearly understood how to add image borders in the way you want. Therefore if you still have any questions, feel free to let me know.