This will be a complete beginner guide to starting a blog and monetizing. I will walk you through all the steps from start to finish and no steps will be skipped. So you can create the blog yourself and monetize it properly.
As a matter of fact, this post is only user-focused and I will not try to sell anything using my affiliate links.
Many people from around the world started blogging but most of them failed & gave up. In the same vein, they lost valuable time, effort & money.
So aside from building the blog, I will also describe everything you need to know about blogging, what to expect, and when to expect it as we go through this guideline.
Let’s get started.
How to create a blog?
There are many different ways to create a blog. Such as you can create a blog using Blogger, Wix, Weebly, Drupal, Jekyll, and even write code.
But in this guideline, I will show you the world’s most popular & easy way to create a blog. You already guessed it WordPress. Right?
Just one more piece of information, it’s self-hosted WordPress and not wordpress.com. This is just because we want full control over the blog. See their differences.
That means we will build the blog on our own hosting. So we can manage the blog exactly the way we want.
So you have to go through the process as you see below.
1. Get a domain & hosting for your blog
This is your first step when it comes to creating a blog. Both these assets will cost you money. But for the rest of the things, we will either use free or do them ourselves. If you already have these two then you’re ready to move to the next step.
- A domain is the address of your blog. For example, “yourblog.com” or “myblog.com.”
- Hosting is simply a place to store your files, folders, database, etc. Think of this as a Pendrive that stays online 24/7. So anyone can visit your blog at any time and from anywhere.
There are countless companies out there you can choose. Think of your blog as a business and this domain & hosting is your investment. But where to buy them?
Well, this is up to you. Since I am not an affiliate, I will not inspire you for a specific company. However, I can teach you how to choose a good domain name that you will find in this post.
In the same vein, I can help you to compare the hosting prices that you will find in this post.
However, to demonstrate and share screenshots, I will use Bluehost but you can use any other hosting company.
2. Install a WordPress theme & plugins for your blog
Now you have the domain & hosting for your blog. Many hosting comes with WordPress preinstalled. But if you need to install it manually, follow this guideline with video instructions. It’s specific to Bluehost but works for other hosting. I mean, the ultimate process is very similar.
Anyways, now you’re ready to install the theme & required plugins.
WordPress comes with 3 different default themes. However, we will not use any of them.
You have to log in to your WordPress dashboard in order to install themes & plugins and manage your blog.
WordPress admin dashboard login method – 1
You can log in to your WordPress admin dashboard by following this URL: “your_domain.com/wp-admin” but don’t forget to replace the “your_domain.com” with your actual domain. Whatever your domain is, put a “/wp-admin” end of it and hit enter.
This will take you to a login window just like the screenshot below.
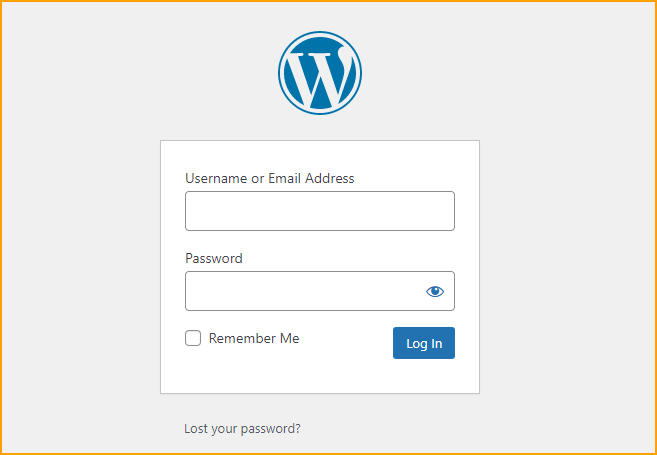
Use your username/email and password to log in. This is the most common way to log in to your WordPress dashboard.
But if you forgot the password, you can recover it from the link “Lost your password?” as you see in the above screenshot.
WordPress admin dashboard login method – 2
However, if you followed my step-by-step guide from the beginning, you can log in to your WordPress dashboard from your Bluehost account.
When you get hosting from Bluehost, they install WordPress on your (primary) domain. In this case, you do not get the password but you can reset the password later. And also you can log in to the WordPress admin dashboard from your Bluehost account.
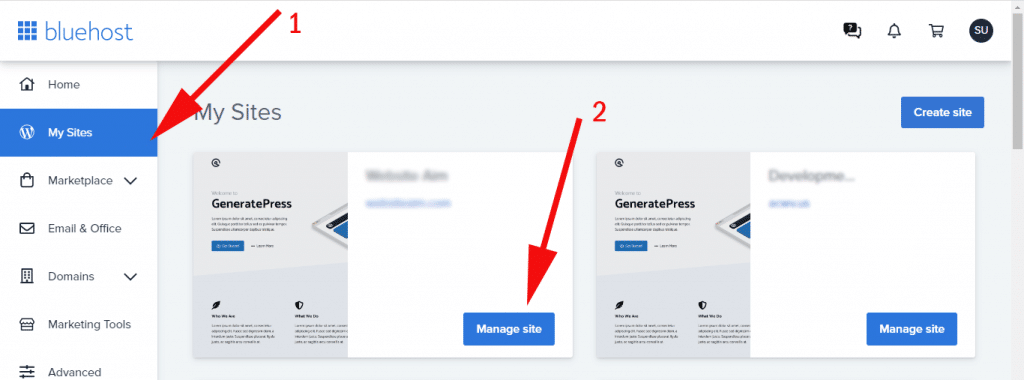
To do that, log in to your Bluehost account, click on “My Sites” and click the button “Manage site” (as you see on the screenshot below).
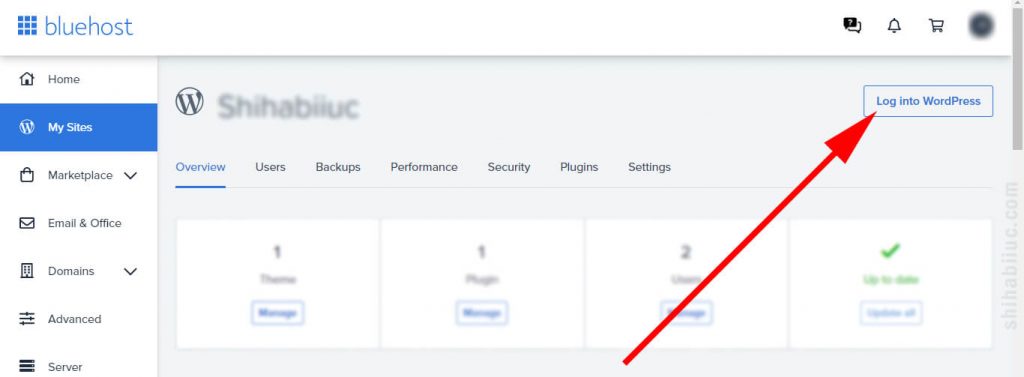
After you click the “Manage site” button, it will take you to an “Overview” page. On the top-right edge, you will find a button to log in to your WordPress website. Click the button “Log into WordPress” as you see in the screenshot below.
Whatever the option you choose, I assume that now you’re logged in to your WordPress admin dashboard successfully.
Install a theme for your blog
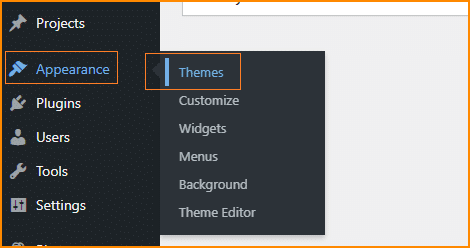
After you log in to your WordPress dashboard, navigate to “Appearance → Themes.”
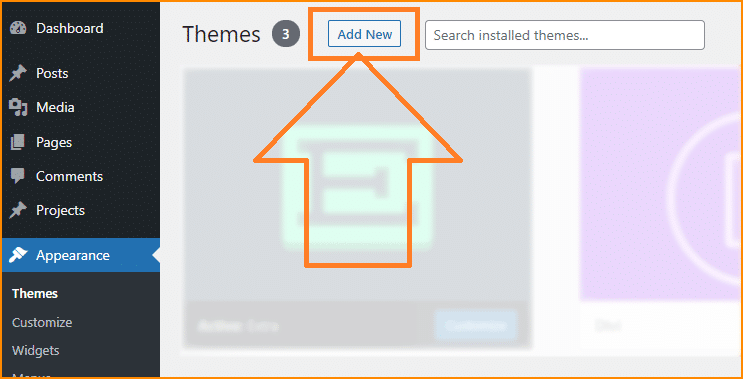
And click on “Add New” as you see on the screenshot below.
There are hundreds of free themes on the WordPress repository that you can choose from. Also, there are premium themes on the marketplaces. But we will use a free theme for your blog.
However, don’t underestimate these free themes. These themes are tested by WordPress before approving them on the repository.
All the themes on the WordPress repository are not equal. Not all themes can serve our purpose.
If you have any specific theme in mind, you can use it. But if you want my suggestion, I recommend you install the “GeneratePress” theme.
There are lots of other good themes for creating a blog. And “GeneratePress” is one of them. It’s not only suitable for creating a blog but also very
- lightweight
- loads very fast (focused on speed)
- Gutenberg block editor-friendly
- Works very well with any page builders
- Fully mobile responsive
- Have different navigation locations & sidebar layouts
- Supports dropdown menus
- Well-documented
Anyways, to install this theme for your blog, type “generate press” on the search bar as you see on the screenshot below.
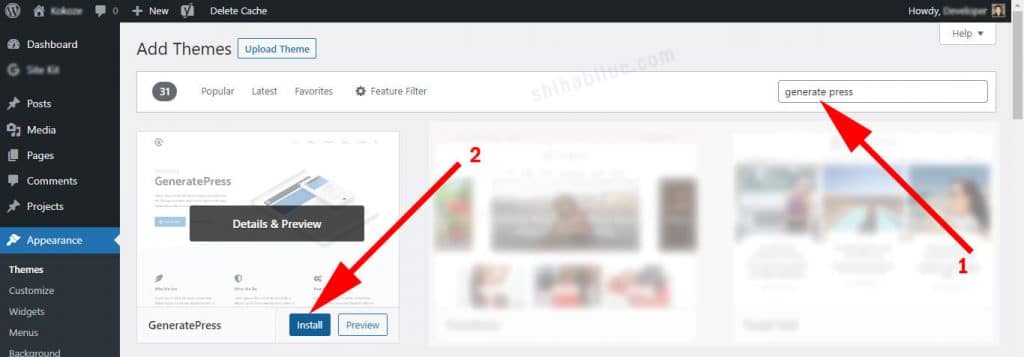
After you find it, click on “Install” as you see on the above screenshot.
Wait! One more last step. After you installed the theme, you also have to activate it. Click on the button “Activate” as you see on the screenshot below.
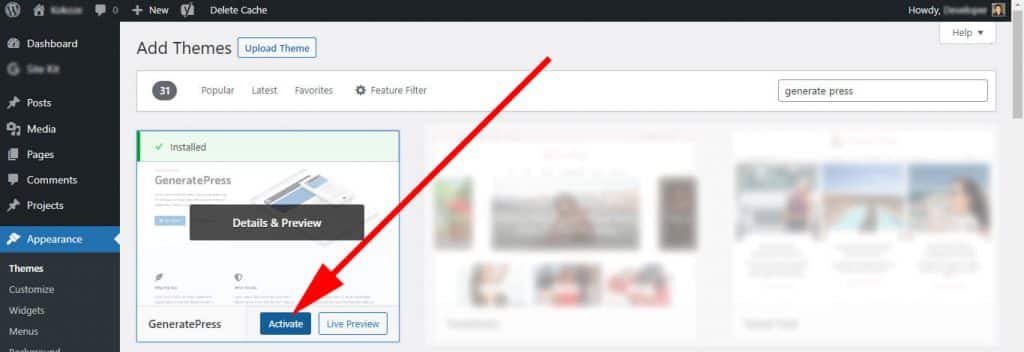
That’s it! You have activated the “GeneratePress” theme for your blog. It’s good to know that you can change your theme anytime in the future.
As I mentioned above, I will not skip any steps to create your blog. So I will also show you how to customize this theme later in this post. So you will know how to upload your logo, favicon, add sidebars, create navigation menus, footer, etc.
For this time being, just activate this theme, leave it as it is, and move to the next. Together we will customize it later in this post.
Install the required plugins for your blog
Think of the plugins as add-ons or apps that give you extra functionalities for your blogs & websites.
Just like the themes, there are hundreds of free plugins on the WordPress repository. But we don’t need many of them. For your blog, we will install a couple of plugins to enhance your blogging experience and maintain your blog easily.
Together we will install the following 6 plugins:
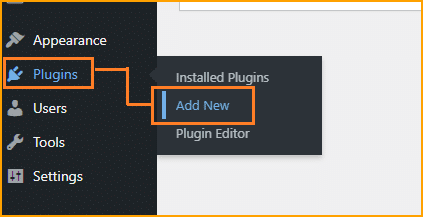
Installing plugins is very easy and the process is very similar to installing themes. To install a plugin, log in to your WordPress dashboard, and navigate to “Plugins → Add New.”
Type the plugin name on the search bar, after you find the plugin click on “Install” and after installing click on “Active.” This is the same process as you installed a theme.
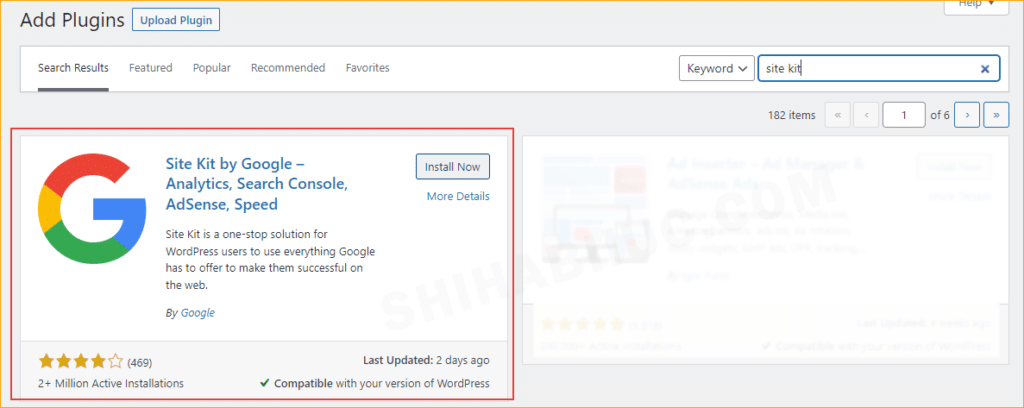
#1. Site Kit by Google:
It’s an official plugin by Google. This plugin helps you to connect your blog with Google Analytics, Google Search Console, Google AdSense, etc.
“Site Kit by Google” requires some configuration and you need to do a couple of homework before starting the configuration. Don’t worry, it’s super easy & just a matter of knowing. And of course, I will walk you through the process in a different section and later in this post.
For this time being, just install & activate this plugin.
#2. Yoast SEO:
Yoast helps you optimize your posts for search engines, suggests improvements for better readability, creates “sitemap.xml”, and lots more.
Follow the same process and install & activate it.
#3. Really Simple SSL:
Its sole job is to force visitors to HTTPS. For example, if a visitor tries to visit “http://your_blog.com/”, this plugin will force the visitor to “https://your_blog.com/”
That means we are utilizing your SSL by cent percent and your blog will always show a “Security Padlock” (Connection is secure) before the URL.
#4. Antispam Bee:
It’s another security plugin that protects your blog from “Spam Commenting” right away.
After you create the blog and publish a couple of posts, spammers from all over the world will start to write spam comments. They also try to inject bad URLs & malware into the comments.
So we have to become proactive and stop the spam bots on the spot.
“Antispam Bee” is one of the most powerful security plugins that doesn’t need any configuration to make it work. Just plug & play.
#5. WPForms:
Your blog needs a contact form so visitors & prospects can contact you. Also, the contact page (form) is required in order to apply for monetization.
For this time being, install & activate the plugin. I will show you how to create a contact page and the contact form (later in this post).
#6. WP Super Cache:
As the name suggests, it’s a caching plugin that helps your blog to load faster.
Its sole job is to create a cache for your blog/website and serve all the requests at the earliest time and without downloading the same files multiple times.
3. Set an SEO-friendly permalink structure
This may seem silly changes to some of you but this is very important for SEO and some other factors.
WordPress has 5 different permalink structures (excluding ‘Custom Structure’). All these have different use cases for different niches. Such as the “Day and name” permalink structure might best suit a newspaper type of website.
But for your blog, you need to make sure that you have the “Post name” permalink structure.
To make this change, log in to your WordPress dashboard, navigate to “Settings → Permalinks” & select the “Post name” and hit the button “Save Changes” (as you see on the screenshot below).
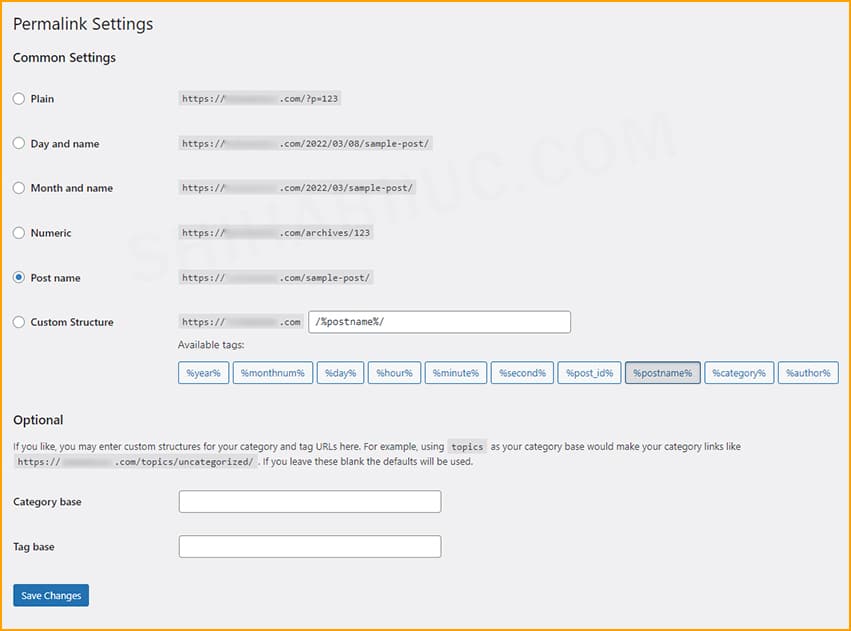
I prioritized it because changing this setting after publishing a couple of blog posts will be a pain for you. Once Google & other search engines crawl your website and start to show posts & pages on the search results, all the visitors will get a “404 Error” if you change the permalink structure. And fixing these issues will require setting up a redirection which is another big hassle.
So make sure you have the proper permalink structure in place. Also, by doing this recommended setting, you can keep the target keywords on the URL.
In my development career, I saw a lot of website owners make this mistake and noticed it after a long period of time. But I want you to start everything in the right direction from the very beginning.
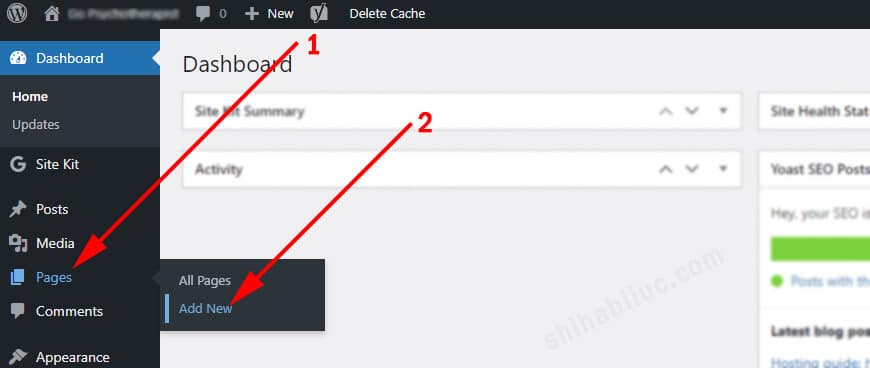
4. Create necessary pages
On your blog, you need a couple of required pages. You can think of these pages are mandatory to have on any blog.
These required pages may vary depending on the niche or type of services you provide or if you sell products. For those blogs that are monetized with ads & affiliates, the following 4 pages are required:
- About
- Contact
- Privacy policy
- Disclaimer
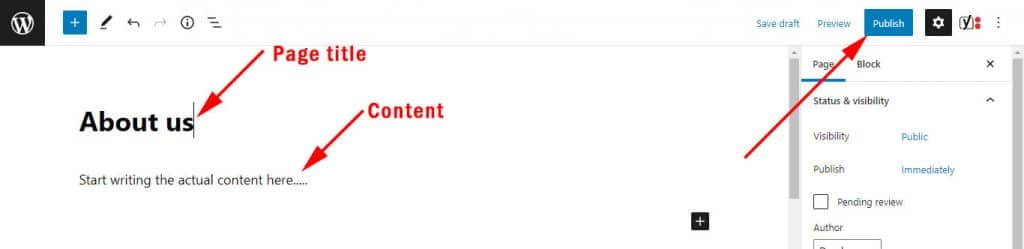
To create a new page on WordPress, navigate to “Pages → Add New” as you see on the screenshot below.
And write the name of the page in the “Title” field & write the actual content underneath it. Finally, hit the “Publish” button once you finish writing (as you see on the screenshot below).
5. Customize the blog (at a minimum level)
Most people waste their time when customizing their blogs. They put their highest effort & priority into the design, changing the logo, color, font, animation, etc.
But these are mostly wasting your time. Because you don’t need a high-end design, super fancy logo, and pixel-perfect measurements in order to start a blog & make a profit from it.
When publishing a new website or blog, most website owners become upset and this is the thing that I noticed in 6 years of web development experience. They think about other people and how those people are going to react to their websites. But in reality, nobody cares about it!
Not only that, many of my clients came back to me in a few days and made fixing over fixing on the design. These are mostly silly changes such as color, font, changing images, and something along these lines. They actually forget or don’t have a goal.
Lastly, many of them give up at a certain period (generally 3/4 months). After a year their domain expires and never come back to blogging.
But I don’t want you to waste time with unnecessary or less important things. Invest your time into whatever is the most important.
Keep in mind that you’re creating your blog to earn revenue from it. So you have to start writing & publishing blog posts at the earliest time possible. During the next six months or so, you have to aggressively publish posts. And once you hit 5K monthly visitors, you can slowly improve the design if needed.
And this is why we will customize the website at a minimum level. So you can start publishing posts and make a profit at the earliest time possible. These customizations will include the following:
- Upload your own logo & favicon
- Create navigation menus
- Setup widgets
- Replace footer texts
6. Start writing blog posts
This is the moment we have been waiting for. Writing blog posts are the topmost important task that you have to keep doing.
If you think of the whole blog as an engine then those blog posts are the fuel. These are the main things on your blog that bring traffic, generate revenue, and open all sorts of possibilities. I will discuss more of them later in this post.
Create necessary categories before you write the blog posts
Before creating any new post, first, create one or two categories based on your niche. Think of a single category as a broad topic. For example, I created a couple of categories for my blog posts such as “Web Development, WordPress, Freelancing, etc.”
You should create at least one category before you start writing the actual blog posts. So you can assign that category to your posts.
Not to mention, you can create the category direct from the post but it’s better to create it before you start writing the posts.
Also, you can create more categories in the future, edit and even delete them.
A category should be one or two words.
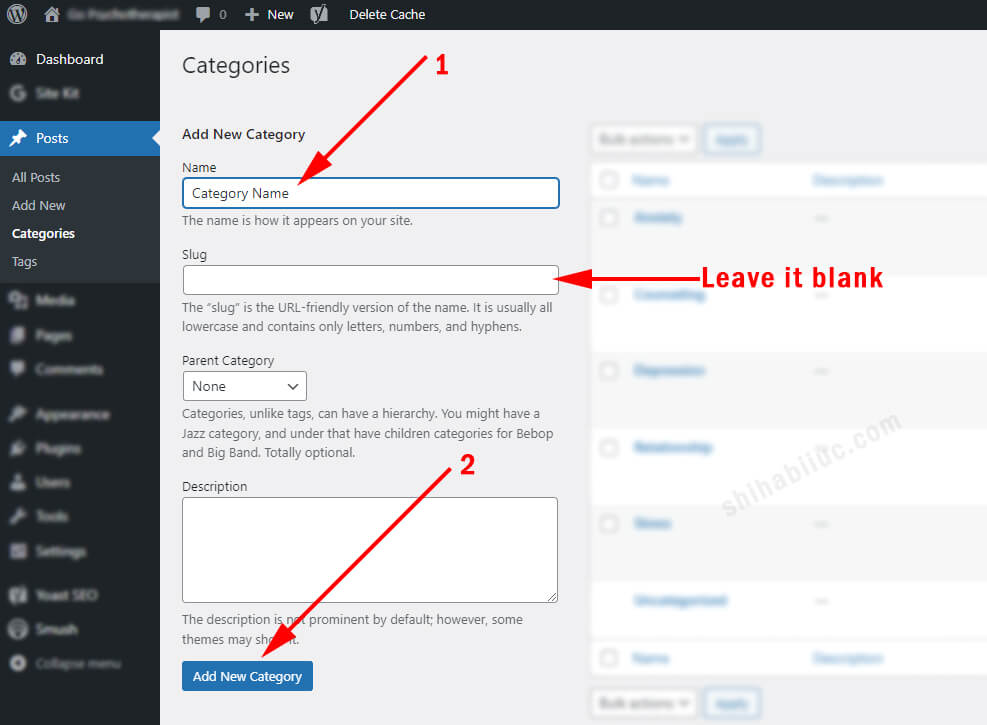
To create a new category, navigate to “Posts → Categories” (as you see on the screenshot below).
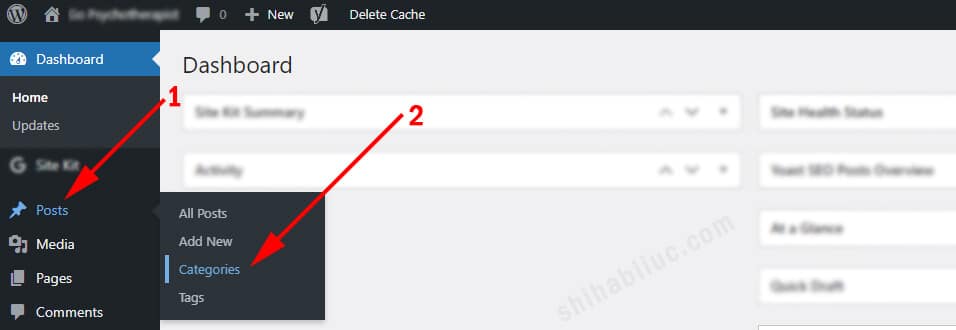
And then write the category name on the “Name Field”, leave the rest of the fields blank and click on the “Add New Category” (see the screenshot below).
These categories are helpful for organizing your blog posts and SEO purpose.
You have seen another option underneath the “Categories” which is “Tags.” We don’t have to do anything with it at this moment.
There are two main types of explanations I saw from SEO experts regarding the tags. Some experts recommend showing tags on the search results. And some other experts recommend the opposite.
After a deep analysis of tags, my personal opinion is to not show them on search results. This is just because it may generate a “Duplicate Content Issue.”
And my recommendation is to use the tags for self-notes and internal uses.
So we will not create any tags when just starting out. But when you have lots of posts, you can create new tags and assign them to your posts. This is the same process of adding new categories.
For example, one of my coworkers created infographics for my blog posts. I created a tag with his name and assigned this tag to all the posts where I used his infographics. This is just a way of identifying those posts where he has contributions. But I should not show his name as a tag on search results or to the visitors. It will be meaningless to them. Right?
So use tags for internal use cases.
You can create sub-categories under another main category. But you can’t create sub-tags under another tag. This is something good to know about tags.
Also, you should not randomly create tags. For example, if you have a tag that is assigned to only one or two posts or no posts belonging to this tag. And by doing so, it will be meaningless to create that tag.
As mentioned earlier, categories organize your posts on a broad topic. And tags help you to organize your posts even further and within the super tiny topics.
How to create a new post on your blog?
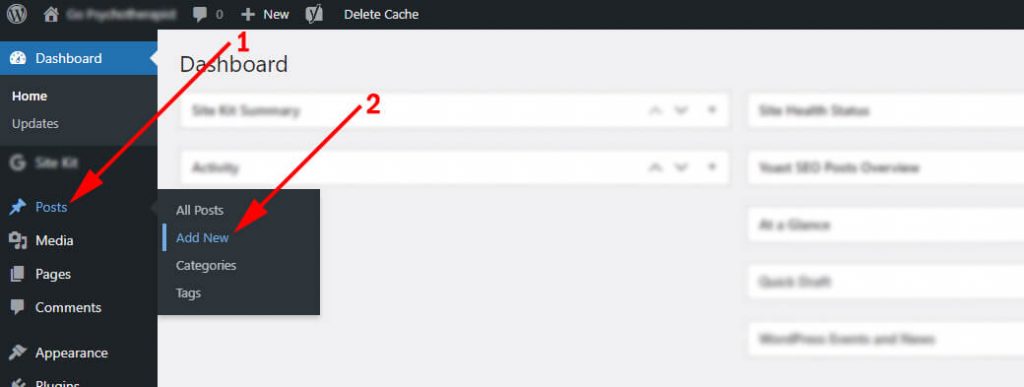
To create a new post, navigate to “Posts → Add New.”
It will open a new screen where you can write the actual blog post.
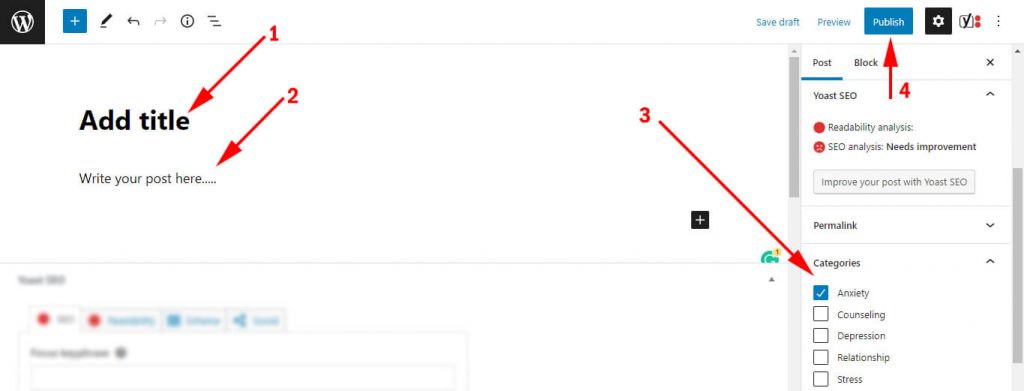
Write your post title on the “Title field”, write the content under the title (Gutenberg block), select a category, and hit “Publish.”
#1 How to insert a heading, paragraph, image, video, list item, table, etc to your blog post?
Now you know how to create a blog post properly. Follow the same process and keep posting new posts regularly.
You may think about what to write, which topics to cover, and how you will get the idea of writing a new blog post. Right? Let’s move on to the next section to find these answers.
7. Find the right topics to write on your blog
Finding the right topics to write about is one of the most crucial parts of blogging. You can’t just write anything you like or whatever you know about.
Whatever niche you chose, make sure that your blog posts are aligned with it.
For example, if your niche is gardening then you should not write about hardware or software. Even though you know both gardening and hardware/software. And this is where trust and authority come into play.
The search engines try to show related results from authoritative sites and those posts that are trusted by the users.
So you have to consider the following two things when choosing a niche:
- Broad niche (that has a lot to write about & people has the interest to read)
- Your expertise
Broad niche:
When you choose a niche or area, make sure it’s broad enough and there is a lot of subject matter that you can write about.
In most cases, blogging success does not come from emotion or the topic that we love to talk about. People’s interests are a big factor when choosing a topic to write about.
A long time before, I had been writing against nulled scripts and trying to make people conscious. But I failed and did not receive huge traction on those posts. So I lost my time & effort (mostly). I realized that the people who are searching for those topics are entitled to use those nulled scripts. And my explanations & suggestions were valueless to them. Finally, assumed that I was suggesting the thief to not stole someone else’s work. So I stop writing on those topics because the target people have no interest in them.
So you have to be careful when choosing a niche and you have to make sure that it’s broad enough & your target people have an interest in it.
Your expertise:
If you don’t know, the internet has more content than we need. No matter what the subject is, you will get hundreds of results if you search on Google or any other search engine. That’s my point of view.
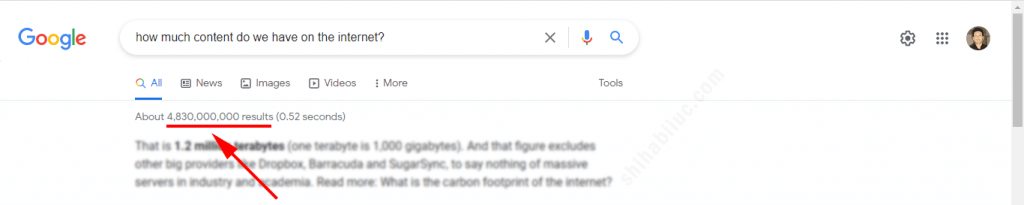
In the above screenshot, you see that I got about 4,830,000,000 results for a single question! Can you imagine how much content we have on the internet?
But don’t get discouraged yet because still we have lots of opportunities to get the outcome from our blogging. And even some of you can do way much better (as a new blogger) than the persons who started blogging in the last few years.
But how?
Though the internet has lots of content, still there is a lack of “Quality Content.” And this is the gap that you have to fill out.
That means you have to write better content than the existing content that we already have on the internet. And this is why your expertise comes into play.
At least you have to add some extra value to your new content. Otherwise, there are no reasons for search engines to send traffic to your post.
This may seem critical but it’s not the case. Every day I see many answers to my questions and most of those posts/answers are ranked on page one (of Google). But there is still a lack of quality and more places to cover on those posts. And I generally take this opportunity to fill out the gaps & rank on Google within a short period of time.
But how to do it yourself? Well, find this answer in the next section.
In a gist, either you have to be an expert on the niche you chose, or at least you should have a deep interest in it. So you can explore things effectively, quickly, and without being insane.
8. Write numerous response posts at the beginning
The term “Response Post” is pretty self-explanatory. The response posts are answers to specific questions. These are short posts and each response post generally contains approximately 1000 words or so.
In your childhood, you may have interacted with the term “WH Questions.” In blogging, the response posts are answers to those “WH Questions.”
To be more specific, these are “what, when, where, how, etc.”
At the beginning of your blog, you have to write lots of response posts. If you ask me for a specific number, anything between “50 to 100” would be great.
These response posts will not only drive traffic to your blog but also help you to reference them from other posts. Think of these references as interlinking among posts. Also, these will help you to build trust & authority for your blog.
Search engines generally don’t rank new bloggers for high-competitive terms, even if you write better posts than others. This is just a lack of authority. But these response posts will help you to get rid of this challenge more quickly.
After you write a numerous number of response posts, you will rank for many long-tail keywords and your blog start to get some momentum. From there, you can start to write for highly competitive keywords that have a high CPC (cost per click).
How to find the topics for response posts?
Depending on your niche, search for any keywords on Google. These could be high-competitive or low-competitive keywords. But after you performed the search, you will find some questions underneath “People also ask” as you see on the screenshot below.
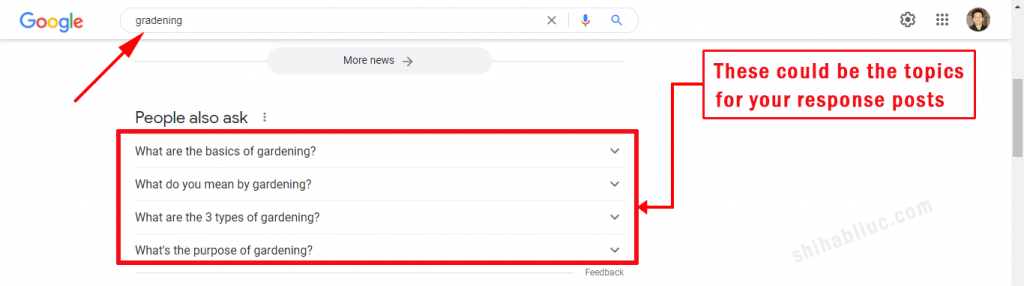
As mentioned earlier, stick to your niche and try to write the highest number of response posts within your niche.
Interlink among posts
Interlink is a link from one post to another in the same blog. For example, in this post, certain words contain some links to other posts.
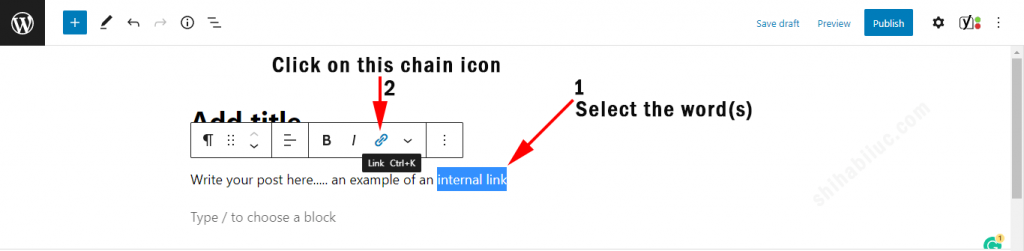
Internal links not only help your readers to understand related topics but also help search engines to discover new posts. And this is why interlinking is important.
In the beginning, you may not have enough posts to make internal linking. But after you publish a new post, you can always go back to new posts and make internal links to the new posts.
But don’t overdo it. Only do it where necessary and don’t pressure for interlinking.
9. Write in-depth articles
After you wrote those response posts, your next step should be to start writing on broader topics that are generally known as long-form articles.
Each of these articles or posts should cover a single topic precisely. So the readers don’t have to go outside if they are unclear about anything. That means you have to elaborate and give references to related terms. This is how these posts automatically become long-form.
Things you should obey/follow when growing your blog
Growing a blog & making it successful is hard. It’s not a get-rich-quick scheme. And this is one of the big reasons why many people fail.
But if you build your blog in the right direction, it can be a great source of your lifetime & passive income. To succeed in blogging, you have to know the system yourself before you hire someone else to work for you.
You have to follow a couple of things when you’re getting started. You can think of these as rules that I learned hard way and that nobody tells you.
#1 Write blog posts yourself and don’t hire writers at the beginning
Some of you may want to hire content writers to write blog posts for you. But it’s one of the big mistakes that many newbies do.
When you’re just starting out, you should write a large number of posts yourself. If you ask me for a specific number, I would suggest you write at least 200 (two hundred) posts yourself.
By writing these articles yourself, you will learn many things along the way. It will give you a solid idea & real experience of blogging.
But if you hire writers at the beginning, most of your blog posts may fail and you won’t be able to suggest improvements.
So you have to learn the system by doing it yourself. After you learned how to write a perfect blog post, only then you can hire other writers. By having this experience, you will be able to direct the writers and explain to them what to include & how to make it stand out.
#2 Don’t waste time with ‘Link Building’
Link building is the process of acquiring links from other websites and blogs. These links are known as “Backlinks.”
If you don’t know, backlinks are one of the many SEO (ranking) factors. But you should not build links manually especially when you’re a new blogger.
If you create awesome content, it may take some time but the backlinks will come naturally.
Many people in the industry, spend a huge time on outreach, guest posts, asking/begging for links, and even buying links. But if you spend this time creating content, you will do even better.
Also, link building is not always helpful and some links can harm your blog.
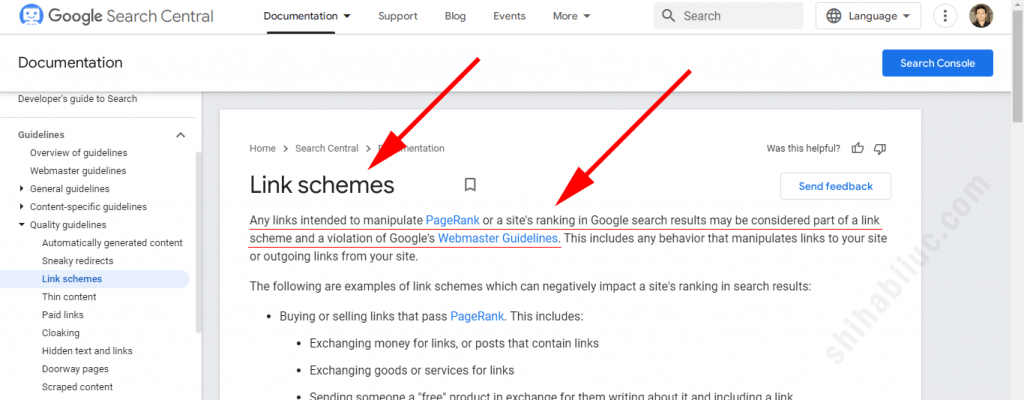
Google has a specific webmaster guideline that clearly states that if you build any links for manipulating your page rank will be considered a “Link Scheme” and a violation of the webmaster guidelines.
So why take this risk when you can rank posts by writing awesome content?
Keep in mind that blogging is a Google-driven business. People search on Google and Google sends those people to your blog to find the answer. But if anyone tries to bypass their rules, it may cause issues.
However, you may have already seen many SEO gurus on YouTube who recommends you to aggressively build links. This is just because they either provide this type of service or they sell some kind of SEO tools that are related to link building.
But from my practical experience, I can assure you that good blog posts can rank higher without link-building effort. And this is what I proved several times.
#3 Focus on the topic instead of the keyword
There are lots of SEO tools out there, we don’t even know all their names.
Recently (2023), some SEO tools are very trending. Those tools will tell you which keywords you can rank for, how many times a keyword you have to include in your post, etc.
By following these tools, some people are writing articles like a machine or robots. And this is not what your actual readers want.
If a blog post is not helpful for the readers, then there is no reason for search engines to rank that post.
Keyword-stuffing posts may rank for a small time but the search engine’s algorithm will understand the fact by the user interactions and push it back away from the search results.
So put your highest effort into the topic that you’re writing about, and not on the keywords. If your readers like your articles, the search engines will also do.
#4 Don’t write blog posts using AI tools
Here AI refers to artificial intelligence. If you don’t know, there are some AI tools that write content.
It’s another trending topic all over the community. Many SEO gurus are recommending these tools.
But this is a bad technology in my opinion. You should never use them. A blog post should be written by a human being and not by a robot.
If a bot wrote an article, will you read it?
I don’t know about it but I will never read it.
If you want to succeed in blogging, you have to stop listening to most gurus, work hard and think wisely. In a nutshell, never ever use AI tools to write your blog posts, write them yourself and make them human-friendly & helpful.
10. Optimize your blog for search engines
Sometimes we make things complicated when it comes to SEO. You don’t have to be an expert in order to optimize your blog for search engines.
When you are getting started, your first step is telling the search engines that your blog exists. So they can crawl your website periodically and show your posts on the search results.
In the next step, you have to monitor if people are visiting your website and get the users’ data.
That means we will do two things in this section:
- Submit your blog to three major search engines.
- Connect your blog to Google Analytics.
Submit your blog to three major search engines
You really don’t need to submit your websites to all the search engines. Also, not all search engines allow you to submit your website to them. For example, DuckDuckGo gets information from other web crawlers or search engines.
In our case, we will use the followings:
- Bing (works both for Bing & Yahoo)
- Yandex
These are the three main search engines that have the most market shares.
Not to mention, you need a Gmail account in order to follow along. If you already have it, you can use that. Otherwise, you have to signup to get one.
#1 How to submit your blog to Google?
In order to submit your website, visit Google Search Console: https://search.google.com/search-console/welcome
And then verify the ownership of your blog using an HTML meta tag. After you verify the ownerships, submit the sitemap.xml file. Follow the above video to get a clear picture.
If it’s still unclear, see a more detailed post only about the Google Search Console setup.
#2 How to submit your blog to Bing (and Yahoo)?
In order to submit your website to Bing & Yahoo, visit Bing Webmasters: https://www.bing.com/webmasters and follow the steps you see in the video.
#3 How to submit your blog to Yandex?
To submit your blog to Yandex, visit Yandex Webmaster: https://webmaster.yandex.ru/sites/add/ and follow the steps that you see in the video.
Connect your blog to Google Analytics
It allows monitoring of your blog visitors. Such as the total number of users for a specific period of time, their countries, devices, traffic channels (how they came to your blog), number of sessions, session duration, bounce rate, etc.
Also, you can see the user data in real time. For example, how many users are visiting your website at this moment, from where they came from, their locations, devices, etc.
Connecting your blog with Google Analytics and getting data is very easy. In order to do that, log in to your Google Analytics account by visiting this URL: https://analytics.google.com/analytics/web/
Make sure that you’re already logged in to your Gmail account before visiting Analytics.
After you log in, create a new property for your website and connect it via SiteKit.
How to earn revenue from your blog?
There are different ways to monetize your blog. In this section, I will discuss the two main revenue streams:
- Ad revenue
- Affiliate revenue
These two revenue streams are very common, effective, and applicable for most bloggers. Also, these two types of income are passive.
I will also give you hints for some other monetization methods at the end.
But before you start to monetize your blog, make sure you have sufficient traffic. This “Sufficient Traffic” is subjective. However, 5,000 traffic is a good starting point.
No matter what your niche, I suggest you do not monetize your blog until you hit 5K traffic. Because you may end up with a couple of pennies each month and it will unnecessarily slow down your blog.
Also, the advertising networks need lots of traffic to analyze your blog and to serve better ads.
1. Monetize your blog with ads (Ad revenue)
This is one of the most common revenue streams among bloggers. Also, it’s very easy to set up ads on your blog.
There are lots of platforms for publishers to earn revenue from their content. But you need to join any one of them. Below I listed four of them:
All these platforms help you to monetize your blog. However, all their RPM is different (revenue per mile or revenue per 1,000 pageviews).
In my observation & practical experience, I saw that Google AdSense has the lowest RPM among all the 4 platforms mentioned above.
Considering the RPM, Ezoic is better than Google AdSense, Mediavine is better than Ezoic, and AdThrive is better than Mediavine.
That means you will get higher revenue from AdThrive than Google AdSense for the same number of traffics or pageviews.
Now you may want to join AdThrive or Mediavine or Ezoic than Google AdSense. But there is a caveat! You can’t join any platform and monetize your blog. Each of these platforms has its own rules & criteria.
For example, in order to join their platform, you need at least a certain number of pageviews or sessions per month. These are as follows:
- AdThrive: 100,000 pageviews
- Mediavine: 50,000 sessions
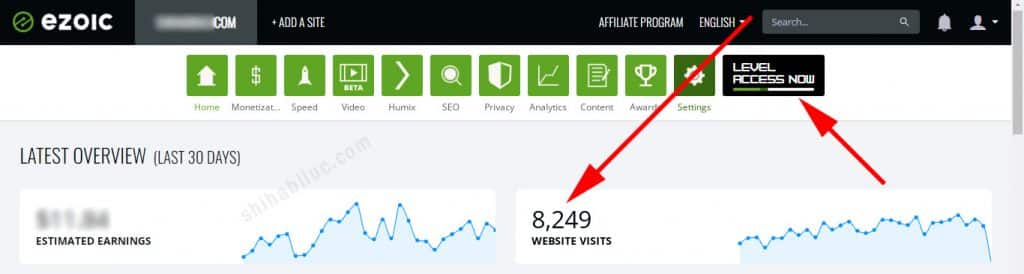
- Ezoic: No minimum traffic requirement (previously their requirement was 10,000 monthly pageviews but currently they lifted this minimum traffic requirement)
- Google AdSense: No minimum traffic requirement and 6-month domain age (12 months for a few specific countries)
I hope this gave you a clear idea about monetizing your blog with ads and now you have a good understanding of these platforms.
Depending on your blog traffic level, join the top platform as much as you can. That means, first try AdThrive if you’re eligible. If you’re not, then try Mediavine in the second step. You get the idea.
Which ad platform is best for beginners
If you have less than 50,000 sessions per month, Ezoic is the best platform to monetize your blog with ads. This session is based on your Google Analytics data.

Ezoic is a certified publishing partner with Google and an award-winning platform for publishers like you. Previously they had a minimum traffic requirement of 10,000 (pageviews) per month. But recently they lifted this minimum traffic requirement and released the “Early Access Program.”
So you can join Ezoic with less traffic and get the full potential of ad revenue.
Also, you can migrate to another ad platform as you get more traffics in the future.
2. Monetize your blog with affiliate programs (Affiliate revenue)
An affiliate program refers to selling someone else’s product or service. After you sign up for an affiliate program, you get a specialized link for that specific product or service. And then you include the specialized link in your post. After that, you get a certain amount of commission if someone buys through your link. This is how affiliate monetization works for your blog.
However, it does not work just by inserting affiliate links in your posts. Also, you should not randomly include affiliate links on your blog.
Before you start to promote an affiliate product or service, I would suggest you buy and test the product yourself. This will give you two primary things:
- Real information about the product or service.
- Whether you should promote the product or not.
Get real information about the affiliate product or service
Many affiliate bloggers and content writers gather information about a product from someone else’s posts or reviews. This is one of the conventional ways to write affiliate articles. And this is one of the big reasons for them not succeeding.
That means if you take information from other posts, you are not adding any value to your affiliate post. If you don’t have practical experience regarding a particular product or service, it means you don’t have enough information about it.
So, in order to get real information about an affiliate product or service, you should use it yourself. You can think of it as an investment in your blogging business.
This will also build the trust and reputation of your blog. And your visitors will find your blog helpful.
Do not promote an affiliate product until you’re sure about it
There are numerous affiliate products and services that you can promote. But all products are not helpful for your audience. Also, some of them are a waste of money.
So make sure you have the correct information and then decide whether you should promote it or not.
But if you follow the conventional system and monetize your blog with affiliate programs just for the sake of revenue, this approach may not help your readers and may be subject to losing reputation.
Depending on your niche, you will find related affiliate programs to promote certain products & services. But make sure these are aligned with your niche.
For example, I write about technology on this blog. So my affiliate products should be related to that. And I should not promote irrelated products such as yoga mats or gardening hand globs even if I know about them.
Many of you may be interested to join the Amazon affiliate program because of its high conversion rate. But my suggestion would be to find something else or find the parent companies who sell their own products or services. Because the commission rate of these companies is higher than Amazon.
3. Some other monetization methods for your blog
Above you learned the two most common monetization methods. However, this is just not limited to those two. There are a few other ways to monetize your blog:
- Selling your own made downloadable eBooks, guides & other digital products.
- Create and sell video course that teaches people how to do certain things.
Aside from these, you can also earn revenue from consulting and providing services as freelance work.
If you’re an expert at certain things, you can provide consultancy in a video call. Also, you can get clients from your blog and work with them as a freelancer.
These are all sorts of possibilities you have and you can implement them when the time is right for you. But don’t go for all the monetizing methods at a time. You should take time & gradually implement them one by one.
Conclusion
Congratulations! Now you know how to start a blog and monetize it properly. You have all sorts of valuable information and step-by-step guideline that I learned hard way in the last 6 years. Luckily you don’t have to do the mistakes that I made in the past. You can think of this guideline as my long years of proven walkthrough and blueprint. If you have any questions or difficulties understanding any part of it, please feel free to ask.