There are hundreds of ways to create a preloader for your website. But in this post, I will show you how to create a gorgeous preload spinner only using HTML, CSS & a few lines of JavaScript. However, you can also convert/implement this preloader on WordPress websites.
First, let’s see the live preview in the link below.
In the live preview/example, the preloader loads for 3 seconds to show you. But on a real website, we want the preloader to disappear after the page finishes loading. And this time is not fixed or static. This DOM loading time is dynamic.
For example, my website may take 7 seconds to load but your website may load in just 1 second.
Whatever the website loading speed is, I will make sure the preloader goes away as soon as the page finishes loading.
Do you want to get this preloader as a WordPress plugin?
I gave you all the code (HTML, CSS & JavaScript) for this preloader. And you can implement it for free (on any number of static websites).
But if you want this preloader as a WordPress plugin, you can buy it only for a small price. Lifetime updates & support are included even if the price goes up in the future.
See more details »How to create a dynamic preloader for your website?
First of all, I want to let you know that this guideline will take a little web design and development knowledge to consume. However, you don’t have to be a guru to follow along.
That means you need a good understanding of HTML, CSS, and a very basic knowledge of JavaScript.
But if you do not know any of these properly, you can download or copy-paste my source code to your template. However, this post is intended to make you understand how things work behind the scene.
Project structure of this preloader
You may already have an existing project setup that might be different than mine. If this is the case, you can adjust the file path in a couple of minutes to make it work.
Here is my files & folder structure which is pretty straightforward.
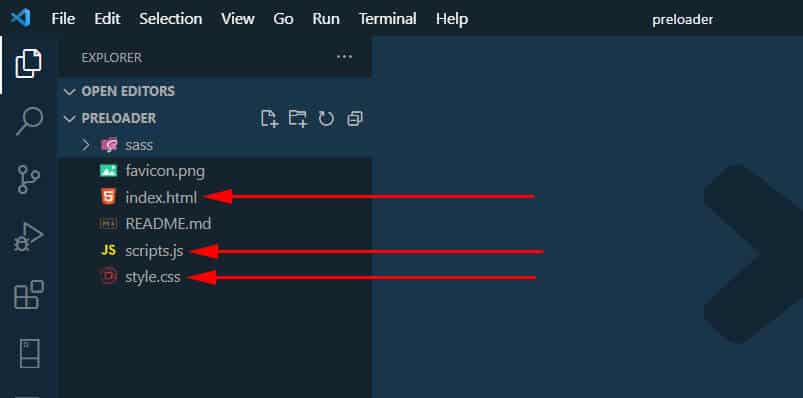
My project folder is named “preloader” and it could be anything in your case. In the above screenshot, you see that I have 3 files such as index.html, scripts.js & style.css. You can ignore the rest of the files and folders that I created for a different purpose.
For example, you see a folder named “sass.” Here I write SCSS to output my CSS along with vendor prefixes. But you don’t have to do this if you’re not familiar with SASS. This is totally optional. You can only follow the “style.css.”
You can use any text editor of your choice. I am using VS Code.
Linking the script & stylesheet file to the index.html
This topic may be very silly to some of you. However, I want everyone can follow this process and even novices. So if you already know how to link scripts & stylesheets to HTML, you can skip this section.
Linking the stylesheet to the HTML file
In my index.html file, I linked my style.css file using the following line.
<link rel="stylesheet" href="./sass/style.css">Because I am using SASS and I have my style.css in the “sass” folder.
But if you’re not using SASS, you can link the style.css from the project root. And instead of the above code, your link will be like this:
<link rel="stylesheet" href="style.css">This <link> tag will go (anywhere) in between the <head> tag of your HTML file. Also, make sure the link tag does not have any closing tag as you normally do with other HTML tags.
Linking the JavaScript to the HTML file
Linking JavaScript is a bit different than stylesheet. We (generally) link the JavaScript files before the closing body tag (instead of the head tag). And we use the <script> tag instead of the <link> tag. Also, the script tag has an “src“ attribute instead of a “href” attribute.
This is how you can link a JavaScript file to your HTML:
<script src="scripts.js"></script>Again, make sure it goes before the closing body tag as you see below.
  <script src="scripts.js"></script>
</body>
While we’re learning (me too), I want to help you one step further.
Difference between the link & script tag
I don’t know about you but I was messing up with the link & script tag. As well as linking stylesheet & script. This is when I first started learning to code. Most of the time, I have to Google to figure this out. And I think it happens with many of you.
But if you see the difference between the link & script tag, you will never forget how to link the stylesheet and script to HTML. And this is how I remember it.
| Link tag | Script tag |
|---|---|
| does not have any closing tag. | has a closing tag. |
| has a “href” attribute that contains the file path. | has an “src” attribute that contains the file path. |
| generally used in the <head> tag. | generally used before the closing </body> tag. |
| used to connect stylesheets. | used to connect JavScript files. |
You may already know these differences. But you may have not compared these two side-by-side like this. I hope, from today it will never confuse you when linking a stylesheet or script.
HTML – markup for the preloader
Just underneath the opening <body>, I have an HTML markup for the preloader as you see below.
<div id="loader-wrapper">
  <div id="loader"></div>
  <div class="loader-section section-left"></div>
  <div class="loader-section section-right"></div>
</div>
I have 5 different CSS classes & IDs in the above HTML markup. You will see more detail in the next CSS section and know why I created those IDs & Classes.
CSS – stylesheet for the preloader
#loader-wrapper {
  position: fixed;
  top: 0;
  left: 0;
  width: 100%;
  height: 100%;
  z-index: 1001;
}
#loader-wrapper .loader-section {
  position: fixed;
  top: 0;
  width: 51%;
  height: 100%;
  background: #fff;
  z-index: 1000;
  -webkit-transform: translateX(0);
          transform: translateX(0);
}
#loader-wrapper .loader-section.section-left {
  left: 0;
}
#loader-wrapper .loader-section.section-right {
  right: 0;
}
#loader {
  display: block;
  position: relative;
  left: 50%;
  top: 50%;
  width: 150px;
  height: 150px;
  margin: -75px 0 0 -75px;
  border-radius: 50%;
  border: 3px solid transparent;
  border-top-color: #3498db;
  -webkit-animation: spin 2s linear infinite;
          animation: spin 2s linear infinite;
  z-index: 99999;
}
#loader:before {
  content: "";
  position: absolute;
  top: 5px;
  left: 5px;
  right: 5px;
  bottom: 5px;
  border-radius: 50%;
  border: 3px solid transparent;
  border-top-color: #e74c3c;
  -webkit-animation: spin 3s linear infinite;
          animation: spin 3s linear infinite;
}
#loader:after {
  content: "";
  position: absolute;
  top: 15px;
  left: 15px;
  right: 15px;
  bottom: 15px;
  border-radius: 50%;
  border: 3px solid transparent;
  border-top-color: #f9c922;
  -webkit-animation: spin 1.5s linear infinite;
          animation: spin 1.5s linear infinite;
}
.loaded #loader-wrapper {
  visibility: hidden;
  -webkit-transform: translateY(-100%);
          transform: translateY(-100%);
  -webkit-transition: all 0.3s 1s ease-out;
  transition: all 0.3s 1s ease-out;
}
.loaded #loader-wrapper .loader-section.section-left {
  -webkit-transform: translateX(-100%);
          transform: translateX(-100%);
  -webkit-transition: all 0.7s 0.3s cubic-bezier(0.645, 0.045, 0.355, 1);
  transition: all 0.7s 0.3s cubic-bezier(0.645, 0.045, 0.355, 1);
}
.loaded #loader-wrapper .loader-section.section-right {
  -webkit-transform: translateX(100%);
          transform: translateX(100%);
  -webkit-transition: all 0.7s 0.3s cubic-bezier(0.645, 0.045, 0.355, 1);
  transition: all 0.7s 0.3s cubic-bezier(0.645, 0.045, 0.355, 1);
}
.loaded #loader {
  opacity: 0;
  -webkit-transition: all 0.3s ease-out;
  transition: all 0.3s ease-out;
}
@-webkit-keyframes spin {
  0% {
    -webkit-transform: rotate(0deg);
            transform: rotate(0deg);
  }
  100% {
    -webkit-transform: rotate(360deg);
            transform: rotate(360deg);
  }
}
@keyframes spin {
  0% {
    -webkit-transform: rotate(0deg);
            transform: rotate(0deg);
  }
  100% {
    -webkit-transform: rotate(360deg);
            transform: rotate(360deg);
  }
}
We have to make sure the loading spinner blocks the entire viewport (both in width & height). So I have the “#loader-wrapper” fixed position and width & height of 100%. Otherwise, the spinner or loader will stay on the top and other parts of the page will be visible.
The “#loader” has 150 pixels of width & height. This is the size of the main spinner. But you can change this size if you wish to. Let’s go with 150px so we both are on the same page.
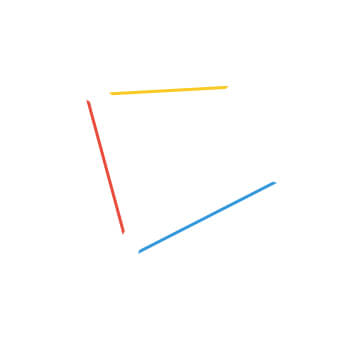
This “#loader” also has 2 pseudo-elements (before & after). Both of these have only a top border of 3 pixels (including the “#loader” border).
Now we have 3 different elements in this “#loader” div. All these have a border-top of 3 pixels. To make these borders look like circles, I made their radius 50%. Otherwise, the spinner will look like the screenshot below.
After making the circle using a 50% radius, the loading spinner looks like the following screenshot and as you saw in the live preview.

Lastly, when the preloader finishes loading, it disappears with a nice animation. Center to left & center to right animation happens with the “.loader-section” (.section-left & .section-right). It happens with transform: translateX(-100%) & transform: translateX(100%). This is how the screen divides into two parts (center to left & right). There is a transition property to look nice instead of jumping.
The infinite looping This animation has been created with CSS keyframe & animation & transform (rotate) property.
JavaScript – scripts for the preloader
We have to make the preloader disappear dynamically after the page finish loading. And this is where JavaScript comes into play.
JavaScript has a built-in event called “DOMContentLoaded” and it fires when the document/page is fully parsed/resolved/loaded. This event takes two parameters: the first one is a function and the second one is the time the function will execute after. In my case, it’s 10 milliseconds (0.01 seconds) which is not noticeable in human eyes.
See the entire JavaScript below.
document.addEventListener("DOMContentLoaded", function() {
  setTimeout(function() {
      document.querySelector("body").classList.add("loaded");
  }, 10)
});
As you see in the above code, I have setTimeout method inside the function.
After the DOM is loaded, I am adding a CSS class of “loaded” to the HTML <body> tag. So I can write CSS by targeting this class name and making the preloader disappear. For an example, see the CSS below.
.loaded #loader-wrapper {
  visibility: hidden;
  transform: translateY(-100%);
}
.loaded #loader {
  opacity: 0;
}
That means we are adding the “loaded” class using JavaScript. And the preloader disappears as soon as the “loaded” class is added to the <body>. Otherwise, the loading spinner or the preloader would load sine-die.
That’s all!
Wondering how to create a video preloader? See how you can create it.
| Learn & practice CSS with real-world examples |
|---|
| Learn basic CSS from the ground up. |
| Build real projects in HTML CSS. |
Build HTML CSS projects
Conclusion
This is how you can make a preloader using only HTML, CSS & JavaScript and make the preloader disappear as soon as the web page finishes loading.
If you want the preloader to appear on the entire site, you have to include the HTML markup on every page.
I did not use any spinning GIF images. The spinner is created using CSS, especially border & transform (rotate).
Now let me know if you liked the preloader and were able to make it.


2 comments on "How to create a preloader using HTML, CSS, JavaScript (download template)"
Hej
first of all, thank you for the tutorial and for making your work available.
I still have a question, I am bothered by the sliden, how can I make that after the page is loaded, just the white background and the rotating circles disappear without animation? Or cool it would be if it disappears with a blur effect.
Thanks
Karmisch