If you want to create a video preloader on your website, this post will walk you through the complete process. I also showed you four different examples of how to create the preloader on a static HTML website, Divi, and Elementor pro website and how to exit the preloader dynamically with the DOM (content) fully loaded.
I used the same technics with a slightly different approach depending on the CMS (WordPress), page builders, etc.

What is actually a preloader?
A preloader is a loading screen that is visible until the webpage is fully loaded. It disappears after the DOM (content) is loaded or after a certain time.
There are various types of preloaders on the web. It’s not mandatory to have one, but in some cases, it’s helpful, especially if your website takes a long time to load.
Sometimes, certain web pages look distorted or broken until they finish loading. In this case, a preloader is helpful.
Also, some website owners like to show a preloader for a certain/exact amount of time.
In most cases, you’ll see preloaders with PNG, GIF, SVG, and a growing percentage of loading completion (like a progress bar or circle). See an example (live preview) of a regular preloader. If you liked this live preview, see its setup guidelines.
What is a video preloader?
A video preloader works the same way as mentioned above, showing a video instead of images (PNG/JPG), GIF, etc.
Video preloaders are rare on the internet, and I have not found documentation or plugins to make one.
Recently (December 2022), I came across a request where someone needed a video preloader at any cost, as he wanted to display a video with a logo animation.
This is why I created it and shared it with others if it helps any of you.
Let’s get started!
How do you create a video preloader?
There are various ways to create a video preloader, and every developer will do it differently. In the video, I showed my preferred way.
You may have to apply some tweaks based on the type of website you run. However, here I showed you a couple of different examples based on situations.
How do you create a video preloader on a static HTML website?
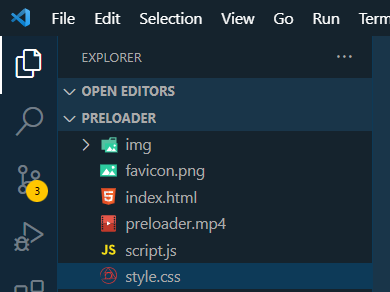
In this project structure, you need three files that are mandatory: index.html, style.css & script.js and the rest of them are optional but good to have.
I also have a video file named “preloader.mp4”
As mentioned in the above video, add the following HTML markup after the opening body:
<div id="prelaoder">
    <video autoplay muted>
      <source src="./preloader.mp4" type="video/mp4">
      Your browser does not support html video
    </video>
</div>
We want to make the video full screen no matter the screen size. So I have the following CSS that you should too:
#prelaoder {
  position: fixed;
  top: 0;
  left: 0;
  right: 0;
  bottom: 0;
  background-color: rgba(0, 0, 0, 0.75);
}
#prelaoder video {
  width: 100%;
  height: 100;
  object-fit: cover;
}
body.loaded #prelaoder {
  display: none;
}
The last line of the CSS has been written matching with JavaSript mentioned below. We are just adding a future CSS class name of “loaded” to the body.
We want the video preloader to disappear after 5000 milliseconds (5 seconds). In order to do that we need to add the “loaded” CSS class to the opening <body> after this timeframe. To accomplish this, here is my JavaSript:
setTimeout(function() {
  let body = document.getElementsByTagName("body")[0]
  body.classList.add("loaded")
}, 5000)
That means we are only doing one thing using JavaScript which is adding a certain CSS class name to the opening <body> after 5 seconds.
That’s it!
Now if you refresh your static webpage, you will see that the video preloader is working and disappears after 5 seconds.
How to create the video preloader on a Divi website?
After you log in to your WordPress dashboard, navigate to “Divi – Theme Options” and under the “Integration” tab, copy & paste the following HTML code (as you see on the video).
<div id="prelaoder">
    <video autoplay muted>
      <source src="https://absolute-path-to-the-video.mp4" type="video/mp4">
      Your browser does not support html video
    </video>
</div>
Make sure you replaced the video link with your own video (absolute path).
Next, copy-paste the following CSS to your theme customizer (Divi – Theme customizer – Custom CSS). Don’t forget to save/publish the latest CSS.
#prelaoder {
  position: fixed;
  top: 0;
  left: 0;
  right: 0;
  bottom: 0;
  background-color: rgba(0, 0, 0, 0.75);
  z-index: 9999999;
}
#prelaoder video {
  width: 100%;
  height: 100;
  object-fit: cover;
}
body.loaded #prelaoder {
  display: none;
}
This is the exact CSS as the static site example with a higher z-index to the “#preloader” and that’s it.
Next/finally, on the same “Integration tab” (Divi), paste the following JavaScript (by wrapping in <script> tag as you see below).
<script>
    setTimeout(function() {
    let body = document.getElementsByTagName("body")[0]
    body.classList.add("loaded")
    }, 5000)
</script>
It’s actually, JS but wrapped within <script> tag and that’s why you see the file type of “HTML.” Anyways, you’re done with it.
Go to your Divi site and refresh the page. Now you will see the video preloader is working on your Divi website.
How to create the video preloader on the Elementor pro website?
You can do it on a free Elementor website as well but in this example, I showed you how to do it on an Elementor premium website.
Navigate to “Elementor – Custom Code” create a code block and paste the exact code that you see on the above Divi HTML. Don’t forget to replace the video link with yours.
Make sure the location is set to “<body> – Start” and publish your code.
Next, follow the same process and create another code block. Copy-paste the exact code from the above Divi script & hit publish.
Next/finally, navigate to “Appearance – Customize – Additional CSS” and copy-paste the exact CSS from the above Divi CSS.
How to dynamically close the video preloader?
Sometimes you may need to close the preloader dynamically after the DOM (content) has finished loading. In this type of case, we can’t use the “setTimeout” method. Instead, we need to calculate the time dynamically.
There are different ways to handle this situation, and in my opinion, the “DOMContentLoaded” event is the perfect & easiest solution.
This event fires a function after the DOM finishes loading. So, instead of setting a static time and the “setTImeout” method, wrap the previous two lines of JavaScript within “DOMContentLoaded” event. If it’s not yet clear to you, then copy-paste the following code (in order to dynamically handle the time to exit the preloader):
document.addEventListener("DOMContentLoaded", function() {
  let body = document.getElementsByTagName("body")[0]
  body.classList.add("loaded")
})| Learn & practice CSS with real-world examples |
|---|
| Learn basic CSS from the ground up. |
| Build real projects in HTML CSS. |
Build HTML CSS projects
References that I mentioned in this post (and video)
I tried to make this process of creating a video preloader as simple as possible and explained the code. Therefore, if it’s not working on your project or you find it difficult, feel free to reach out. I will try to help every one of you as much as possible.


2 comments on "How to create a video preloader on your website (Static, Divi, Elementor)?"
Hi, I’m using Divi. It’s working well. How do I disable it from mobile phones?