CSS gives you huge flexibility to select one or more HTML elements exactly the way you want. Using multiple classes & IDs and making a combination of both gives you the ability to do that. But you have to know how multiple CSS selectors work together to get the most out of it.
In this post, I will show how you can use multiple classes & IDs in CSS, and make a combination of these two. Also, you’ll get some real-world code examples that will give you a clear concept of using them properly.
How to use multiple CSS classes & IDs?
Before learning how to do something, you should learn why you need to do it in the first place. It’s not only applicable for multiple classes or ID selectors but also for other things.
Why do you need multiple classes & IDs in CSS?
Well, you need them for many reasons but not only limited to:
- Selecting elements conditionally
- Changing/overriding CSS specificity
- Grouping elements together for the same styles
- Helps to follow the DRY (don’t repeat yourself) principle, etc
Now you knew the reasons for using multiple classes & IDs. Let’s see how to use them properly.
Imagine that you have two sections in your HTML markup as follows:
<section class="row banner">
  <!-- other content goes here -->
</section>
<section class="row">
  <!-- other content goes here -->
</section>
The first one has two classes .row & .banner and the second <section> has only one class of .row
Now if you want to add different styles to these sections, you can select them separately. For the first section, you can select by .row.banner
And for the second section, you can select .row and add different styles to it. See the example CSS below.
.row.banner {
  padding: 90px 15px;
  background-color: red;
}
.row {
  padding: 60px 15px;
  background-color: green;
}
Now it brings me to the next example.
If you take a closer look at the above CSS (first line), there is no space between .row & .banner
But if you add a space by mistake, the above styles won’t be applied to the first <section> because it has a different meaning in CSS.
The space between the two classes means that the first CSS class is a container element of the second one.
<section class="row">
  <div class="banner">
    <!-- other content goes here -->
  </div>
  <div class="cta">
    <!-- other content goes here -->
  </div>
</section>
To target or select the above <div> that has a class of .banner, you have to specify it as I did below.
.row .banner {
  /* element style goes here */
}
In the above selector, there is a gap between the .row & .banner and this is known as a descendant selector.
But if you want to select an element that immediately comes after another element (in the same level), you need to use an adjacent sibling selector. Not to mention, you can select the second div in the same vein (using a descendant selector) like this: .row .cta
However, there are some situations where you may not have an exact known class name but you need to select the immediately following first item. In this type of case, the adjacent sibling selector comes handy. For example, in the above HTML markup, you can select it like this: div + div.
Wrap up the concept of the gap between classes:
If there is no gap between two classes or among multiple classes, it means all the classes live in the same HTML element.
If there is a gap between two CSS classes, it means the first one is the containing HTML element of the second one. And the level could be one or more levels deeper. See the HTML below for more clarification.
<section class="row">
  <div class="unicorn">
    <div class="pizza">
      <div class="unicorn">
        <div class="burger">
          <div class="unicorn">
            <!-- other content goes here & there -->
          </div>
        </div>
      </div>
    </div>
  </div>
</section>
In the above HTML, I have 3 different divs with different levels that have a CSS class of .unicorn
Now if you want to target all the divs with this class name, you can do it as you see below.
.row .unicorn {
  /* style goes here */
}
And the same styles will be applied to all HTML elements that have the class of .unicorn
Combination of CSS ID & class
CSS IDs are unique and you should try to use them once on a page because they have linking behavior. However, sometimes you may also need to use one ID multiple times on a single page for styling purposes. There is a debate in the developer community about using an ID one or multiple times. Most of their evidence is strong. So, I recommend using an ID only once if you’re using them as an anchor.
Anyways, you can combine CSS IDs & classes together as you did with multiple classes. Let’s see the following HTML markup.
<div id="hello">
  <div class="world">
    <!-- other content goes here -->
  </div>
</div>
If you want to target the second <div>, your CSS selector will be like this:
#hello .world {
  /* style goes here */
}
It means applying the style on the HTML element(s) that has/have a class of .world which lives under the #hello ID. If you have multiple divs in the same level or deeper level, all these will be affected by the above selector. Let me give you another example to make you understand better.
<div id="hello">
  <p>Level 1</p>
  <div class="world">
    <p>Level 2</p>
    <div class="unicorn">
      <p>Level 3</p>
      <div class="world">
        <p>Level 4</p>
        <div class="pizza">
          <p>Level 5</p>
          <div class="world">
            <p>Level 6</p>
          </div>
        </div>
      </div>
      <div class="world">
        <p>Level 4</p>
      </div>
    </div>
  </div>
</div>
#hello div {
padding: 20px 10px;
background-color: red;
}
#hello .world {
padding: 20px 10px;
background-color: green;
}Based on the first selector #hello div, all the divs that come after the #hello will have a background-color: red; This style also applies to the .world class.
For the second selector, all the div/elements that have .world CSS class will have a background-color: green
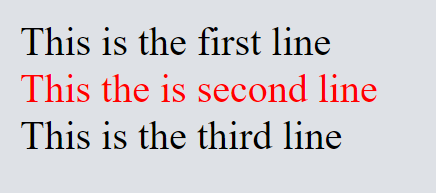
See their output below:
Level 1 ID: #hello
Level 2 class: .world
Level 3
Level 4 class: .world
Level 5
Level 6 class: .world
Level 4 class: .world
Hopefully, this will give you a solid grasp of using multiple classes & IDs in CSS.
How to use two classes together in CSS?
Think of a situation where you have to target an HTML element that has two CSS classes. See the following example:
<div class="apple">This is the first line</div>
<div class="apple banana">This the is second line</div>
<div class="mango">This is the third line</div>
In the above HTML, the second <div> has two classes: .apple & .banana
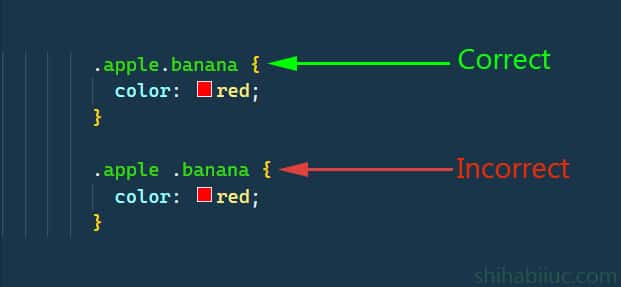
If you want to target this second div in your CSS, you have to write the two classes without any space. See the following CSS below.
.apple.banana {
  color: red;
}
See the output below.
Once again, make sure there is no space between the two classes.
And it brings me to the end of this post.
| Learn & practice CSS with real-world examples |
|---|
| Learn basic CSS from the ground up. |
| Build real projects in HTML CSS. |
Build HTML CSS projects
Conclusion
In this post, I tried to give you a rock-solid understanding of multiple class & ID selectors. I gave you many real examples to easily digest the concept. But if you still have any questions, please let me know.