How to create a back to top button using HTML CSS JavaScript

In this post, I will show how you can create a simple back-to-top button only using HTML, CSS & pure JavaScript. Also, I will give you the sample code (source code) so that you can implement this exact back-to-top button on your projects.

Please see the demo of the finished product that you’re going to build in this post.

Lastly, I will show how you can customize my code so that it matches your own project.

Back to top button sample code

In this section, I will give you all the HTML, CSS & JavaScript. And then I will explain how you can implement this back-to-top button on any existing project.

HTML

If you’re creating a new project, you can use this exact HTML markup to get started. However, if you’re implementing this button to an existing project, my CSS class/ID names may not match yours.

If you can make the necessary changes to your existing project that would be fine. But if you can’t, I will show you how to do this as we go through this post.

See the HTML first.

<header id="top">
  <nav>
    <div class="logo"><h2>Your Logo</h2></div>
    <ul>
      <li>Home</li>
      <li>About us</li>
      <li>Services</li>
      <li>Portfolio</li>
      <li>Contact</li>
    </ul>
  </nav>
</header>
<body>
<!-- your content goes here -->

<a id="gotop" class="backtotop" href="#top"><img src="./img/top-arrow.svg" alt="up arrow"></a>
</body>

As you see in the above HTML, I have a CSS ID #top (in line number 1) and this is required to make the back-to-top button work.

This ID works as an anchor/link. I used this ID only in one place in HTML and did not use it in CSS or JavaScript. To learn more see how to create HTML anchor links that jump to another section of the page.

The actual back-to-top link (<a>) tag contains this ID (in line number 16). So if anyone clicks on it, this link/button will redirect them to the header section of the web page (#top). And this link also contains an icon/image that you can download from my GitHub repository or on this link.

I have this icon in an “img” folder. If your project setup is different then don’t forget to update the file/image path in the HTML (in line 16).

Only with this HTML, the output will look like the following screenshot.

HTML output in back-to-top project
HTML output

Let’s see the CSS below.

CSS

html {
  scroll-behavior: smooth;
}
.backtotop {
  position: fixed;
  opacity: 0;
  visibility: hidden;
  -webkit-transition: opacity .3s 0s, visibility 0s 0s, background-color .3s 0s;
  transition: opacity .3s 0s, visibility 0s 0s, background-color .3s 0s;
  bottom: 20px;
  right: 10px;
  -webkit-box-shadow: 0 3px 10px rgba(0, 0, 0, 0.3);
          box-shadow: 0 3px 10px rgba(0, 0, 0, 0.3);
  background-color: #e1433c;
  height: 40px;
  width: 40px;
  display: -webkit-box;
  display: -ms-flexbox;
  display: flex;
  -webkit-box-align: center;
      -ms-flex-align: center;
          align-items: center;
  -webkit-box-pack: center;
      -ms-flex-pack: center;
          justify-content: center;
  border-radius: 3px;
}
.backtotop img {
  width: 50%;
  height: auto;
}
.backtotop.active {
  opacity: 1;
  visibility: visible;
}
.backtotop:hover {
  background-color: #FE701B;
}

I had other styles for the main demo that you saw at the very top of this post. For example, aligning the navigation menu, header background color, footer background, and a couple of <div> tags to create enough space so that you can scroll. But these are not the actual part of this back-top-top button. So I skipped those CSS as well.

With the above CSS, my back-to-top link looks like the following screenshot.

CSS output in back-to-top project
After adding the above CSS

In line 1, I have scroll-behavior: smooth. It’s optional but good to have. This will scroll the web page smoothly and without this line of CSS, the web page will jump to the top after you click the back-to-top link.

I have a fixed position for the actual back to the top link and it has a 20 pixels & 10 pixels gap from the bottom & right respectively. But this link is not visible yet and I made it hidden using opacity: 0; visibility: hidden

In line 32, I have .backtotop.active { opacity: 1; visibility: visible;} that makes the link visible. But we don’t have the .active class in our HTML.

In the next step, I will add/toggle the .active class based on the scroll position. This is why we need a few lines of JavaScript.

Based on the .active class, I will reverse these two properties/values to opacity: 1; visibility: visible.

JavaScript

const backtotoplink = document.getElementById('gotop')
const onScroll = () => {
  const scroll = document.documentElement.scrollTop
  if (scroll > 0) {
    backtotoplink.classList.add("active");
  } else {
    backtotoplink.classList.remove("active")
  }
}
window.addEventListener('scroll', onScroll)

The sole job of this JavaScript is to determine the scroll position. And add & remove the .active class to the back-to-top link (<a> tag) based on the scroll position.

In line 1, I’m targeting the back-to-top link using the CSS ID and saving it into a variable/constant so we can use it later.

In line 2, this is an arrow function and we are getting the vertical scroll position using the scrollTop property and saving it into a constant (scroll).

Finally, we have an if else conditional block that checks whether a user scrolled or not. And it adds and removes the .active class based on the scroll position. If the scroll position is greater than zero then it will add the class to the actual back-to-top link. Otherwise, remove the class name from the link tag.

This is how the back-to-top button/link appears & disappears based on a user’s scroll position.

Learn more about buttons

Build HTML CSS projects

About us templatePreview
Team pagePreview
Testimonial pagePreview
Testimonial sliderPreview
Contact pagePreview
Multipage websitePreview
Portfolio websitePreview
Animated portfolioPreview
Computer science portfolioPreview
Navigation bar (without JS)N/A
Create a hamburger menuPreview
Create a navigation menu in two waysN/A
Footer templatesPreview
Hero bannerPreview
Background sliderPreview
Card templates (HTML, CSS)Preview
Animated cardsPreview
Three-column layout templatePreview
Two column layoutPreview
Breadcrumb navigationN/A
Progress bar templatePreview
Thank you pagePreview
Resume templatePreview
Coming soon templatePreview
Landing page templatePreview
Roofing website templatePreview

Conclusion

I tried to make this post as easy as possible. If you have any difficulties following this guideline, let me know so I can make further improvements.

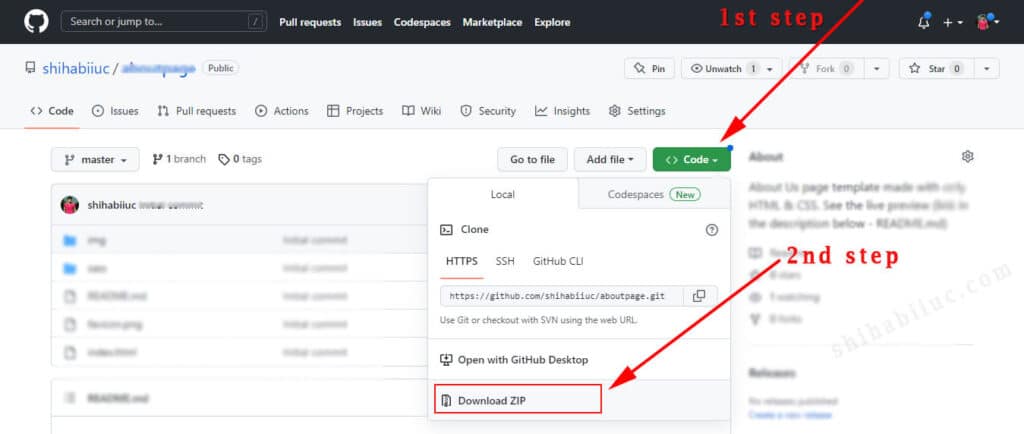
You can also download the entire project from my GitHub repository.

How to download a GitHub repository
This is how you can download the project from my GitHub repository

Also, let me know if you liked this back-to-top button and if the HTML, CSS & JavaScript are well explained.